Why Positioning Matters in Doubles
In badminton doubles, speed and reaction time define every rally. Unlike singles, where players cover the entire court alone, doubles requires two players to operate as a synchronized unit. Proper positioning ensures maximum court coverage, smoother transitions, and fewer unforced errors.
1. Efficient Court Coverage
The doubles court is wider than singles, making horizontal coverage especially critical. When partners stand too close together, they leave wide angles exposed. When they stand too far apart, gaps open in the middle — one of the most common areas where points are lost.
Strong doubles teams divide responsibility clearly:
Each player understands their defensive half.
Mid-court responsibilities are pre-decided.
Both players adjust positioning based on shuttle direction.
Correct spacing reduces confusion and prevents hesitation during fast exchanges.
2. Control of Space and Angles
Doubles is largely about controlling angles. When a pair positions correctly, they shrink the opponent’s attacking options. Coordinated movement increases what coaches call the team’s “control area” — the effective zone from which they can intercept or defend shots.
Coaching frameworks from the Badminton World Federation emphasize structured positioning as a foundation of doubles performance. Players who move as one unit reduce exposure to cross-court smashes and flat drives, while increasing their ability to counterattack.
3. Faster Transitions Between Attack and Defense
Every rally in doubles includes rapid transitions. One lift can instantly turn attackers into defenders. If positioning is misaligned during these transitions, the initiative is lost immediately.
Well-trained pairs:
Recover quickly after smashes
Reset to side-by-side after lifting
Advance to front-and-back after forcing a weak return
Smooth transitions separate intermediate players from advanced competitors.
4. Communication and Role Clarity
In doubles, hesitation costs points. Teams that pre-define roles perform better under pressure.
Examples of role clarity include:
Deciding who takes middle smashes
Assigning responsibility for flat mid-court drives
Determining who dominates the net during attacking phases
When communication is clear — verbally or through positioning cues — both players react instinctively rather than guessing.
Key Insight: In badminton doubles strategy and positioning, controlling space is more important than simply hitting harder.
The Two Core Formations in Badminton Doubles
Every successful doubles partnership relies on two fundamental formations:
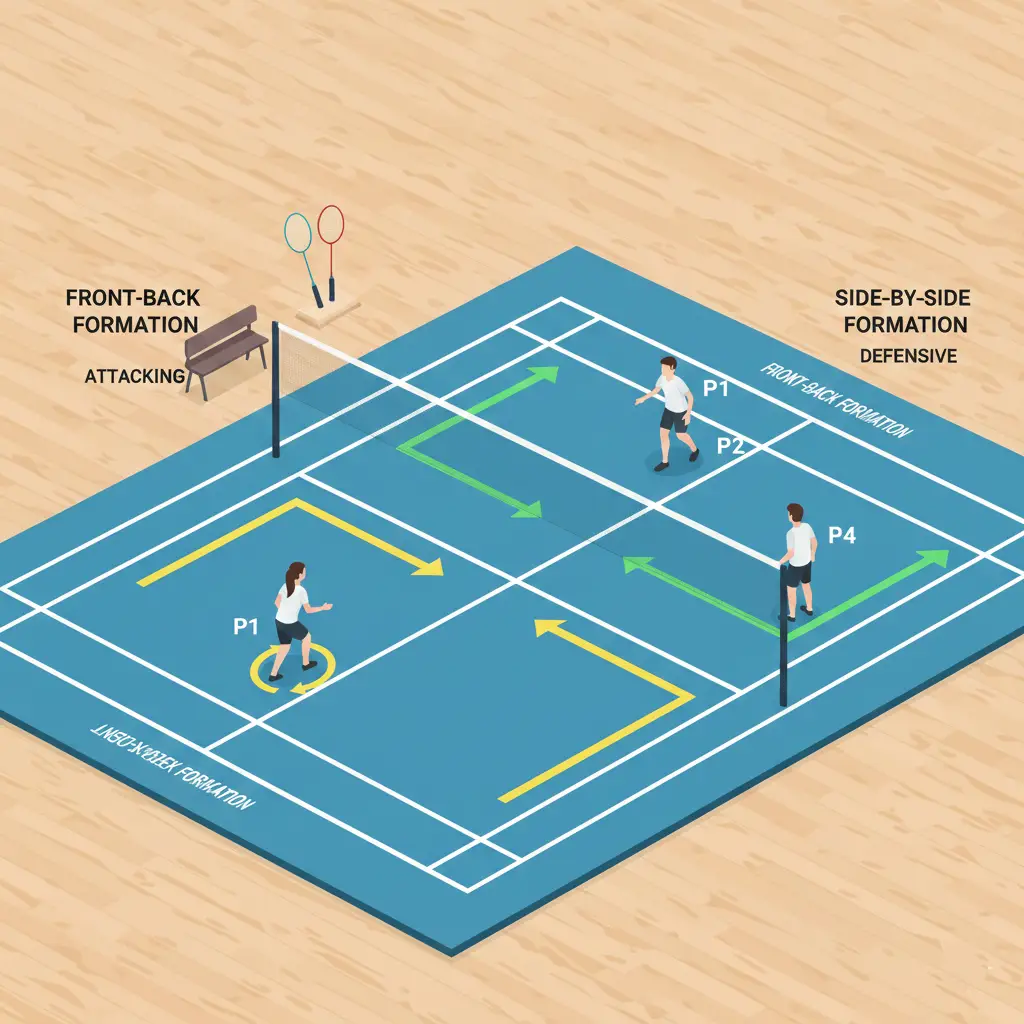
Front-and-Back (Attacking Formation)
Side-by-Side (Defensive Formation)
Understanding when to use each formation — and how to transition between them — forms the backbone of doubles success.
Front-and-Back Formation — The Attacking Structure
This is the primary offensive formation in badminton doubles.
When to Use It:
After playing a smash
When opponents lift the shuttle
During sustained attacking rallies
Player Roles:
Rear Court Player (Attacker):
Executes smashes and steep drop shots
Targets sidelines, body, and middle gaps
Maintains downward pressure
Front Court Player (Net Controller):
Intercepts weak blocks
Finishes points with net kills
Blocks cross-court counters
This formation maximizes attacking angles. The rear player applies continuous pressure from the backcourt, while the front player looks to end rallies quickly.
Proper spacing is essential:
The front player remains alert in a slightly crouched stance with racket up.
The rear player recovers quickly after each smash to maintain balance and readiness.
The front-and-back formation is widely used at competitive levels because it enables sustained offensive dominance.
Side-by-Side Formation — The Defensive Structure
This is the standard defensive setup in badminton doubles.
When to Use It:
When defending against smashes
After lifting the shuttle
During fast flat drive exchanges
Positioning Principles:
Both players stand parallel across the width of the court.
Each player covers one half (left or right).
A slight stagger helps prevent collisions and improves reaction time.
In this formation, discipline is crucial. Players must avoid overcommitting forward. The primary objective is to block smashes, counter with flat drives, or lift deep to regain time and reset the rally.
Defensive posture fundamentals include:
Staying low with bent knees
Keeping the racket in front of the body
Shifting weight slightly forward for quick reactions
The side-by-side formation transforms two players into a coordinated defensive wall.
Why These Two Formations Matter
All advanced doubles strategies — including rotation patterns, serve tactics, and mixed doubles adaptations — are built on these two formations.
Elite pairs constantly shift between:
Side-by-side (defense)
Front-and-back (attack)
The team that transitions faster and more efficiently usually controls the rally.
Rotation: When and How to Switch Roles
Rotation is the process of switching between formations smoothly during a rally. In badminton doubles strategy and positioning, rotation ensures continuous pressure without leaving gaps on the court.
A common coaching principle is: “Follow the shuttle.”
This means players adjust their position according to the shot they play and the opponent’s response.
1. Rotation After a Smash
When the rear player smashes:
The front player stays ready to intercept weak blocks.
If the return is cross-court, the rear player shifts accordingly.
If a drop shot is played instead of a smash, the rear player may move forward and initiate rotation.
Timing is critical. Rotation must be fluid and controlled, not rushed.
2. Rotation from Defense to Attack
When defending in a side-by-side formation:
If one player blocks a smash tightly to the net, that player moves forward.
The partner immediately shifts backward to cover the rear court.
This transition converts the team from side-by-side defense into front-and-back attack.
Quick recognition and communication prevent exposed gaps.
3. Drive Exchanges and Mid-Court Rotations
During flat rallies:
Players generally maintain side-by-side positioning.
If one player creates a downward attacking opportunity, rotation begins immediately.
Clear communication through short verbal calls such as “mine,” “switch,” or “leave” reduces confusion.
4. Common Rotation Mistakes
Rotating too early and leaving the rear court exposed
Both players moving forward at the same time
Poor recovery after smashing
Correct rotation develops through repetitive drills and improved court awareness.
Practical Rotation Drill (Shadow Practice)
A simple way to improve rotation without a shuttle:
Start in side-by-side defensive position.
Simulate lifting the shuttle.
Move into front-and-back attacking formation.
Simulate defending again and return to side-by-side.
Repeat this sequence in cycles to build automatic movement patterns.
Section Summary:
Positioning provides structure.
Formations create tactical clarity.
Rotation connects both into a fluid and winning system.
When these three elements work together, badminton doubles becomes controlled, strategic, and far more effective.
Serving & Receiving Positioning in Doubles
The first three shots in badminton doubles often determine who controls the rally. Unlike singles, doubles rallies are heavily influenced by serve quality and immediate positioning. Proper serve and receive positioning can instantly create attacking opportunities or force defensive pressure on opponents.
Serving Positioning
In doubles, the low serve is the most commonly used serve because it prevents opponents from attacking immediately.
Server’s Position:
Stand close to the short service line.
Keep a balanced stance with racket prepared for the next shot.
Be ready to move forward if the return is tight to the net.
Server’s Partner Position:
Stand slightly behind the service line, closer to the mid-court area.
Prepare to intercept flick returns or lift opportunities.
Stay alert for fast flat pushes toward the body or middle.
The serving pair’s goal is simple: force a weak return that allows transition into a front-and-back attacking formation.
Receiving Positioning
The receiving team has an immediate opportunity to attack if positioned correctly.
Receiver’s Position:
Stand slightly forward of center, ready to push aggressively.
Hold the racket high to intercept low serves quickly.
Attack flat or downward whenever possible.
Receiver’s Partner Position:
Stay slightly behind to cover flick serves.
Prepare to rotate into front-and-back if the receiver gains the attack.
The receiving team aims to seize control within the first two shots by applying pressure immediately.
Flick Serve Adjustments
When facing a flick serve:
The receiver must pivot quickly and move backward.
The partner shifts forward to prepare for front-court coverage.
Clear communication prevents confusion over rear-court responsibility.
Key Serving & Receiving Principles
Keep serves tight and consistent.
Anticipate the third shot
Always think one move ahead.
In doubles, the rally rarely starts neutral — it begins with a tactical advantage or disadvantage based on serve and receive positioning.
Shot Patterns & Targeting Strategies
In badminton doubles, shot selection is not random. Every shot should serve a strategic purpose — either maintaining attack, forcing weak replies, or regaining defensive control.
Understanding common shot patterns improves rally consistency and reduces unforced errors.
1. Smash Targeting Strategy
When attacking from the rear court, placement is more important than power.
Effective smash targets include:
The opponent’s body (limits swing space)
The middle gap between opponents
The sideline to stretch defensive coverage
Smashing repeatedly to the same location can create predictability. Smart attackers vary angle and speed.
2. Playing to the Middle
Many points in doubles are won by targeting the space between opponents. This area often causes hesitation because both players may expect the other to take the shot.
Benefits of middle targeting:
Creates confusion
Reduces sharp cross-court angles
Increases chance of weak defensive blocks
3. Flat Drive Exchanges
Flat rallies require quick reflexes and stable positioning.
During drive exchanges:
Maintain side-by-side formation.
Keep racket in front.
Avoid lifting unless necessary.
Winning flat exchanges often shifts momentum into attack.
4. Net Play Strategy
The front player controls tempo at the net.
Effective net tactics include:
Tight net drops to force lifts
Quick net kills on loose returns
Controlled pushes to the mid-court
The goal is to create opportunities for the rear player to smash again.
5. Defensive Shot Strategy
When under pressure:
Block straight first
Avoid risky cross-court lifts
Lift deep and high when necessary
Defensive patience often creates counter-attacking opportunities.
Mixed Doubles Shot Considerations
In mixed doubles:
Teams often prefer front-and-back structure.
The rear-court player focuses on steep attacking shots.
The front-court player prioritizes net control and interceptions.
Role clarity is essential for effective mixed doubles performance.
Communication & Role Clarity
Even technically strong players struggle in doubles without communication. Successful pairs function as one coordinated unit rather than two individuals.
1. Verbal Communication
Short, clear calls reduce confusion:
“Mine”
“Switch”
“Leave”
Calls should be early and decisive, not reactive.
2. Non-Verbal Communication
Body positioning often signals intention:
Stepping forward indicates attacking transition.
Dropping slightly backward signals defensive readiness.
Eye contact between rallies reinforces coordination.
3. Defining Responsibilities
Before matches, partners should agree on:
Who takes middle smashes
Who covers deep backhand clears
Who handles tight net shots
Pre-defined structure eliminates hesitation under pressure.
4. Trust and Adaptability
Trust allows players to commit fully to their roles. When both partners believe in the system, rotations become automatic and movement becomes synchronized.
Adaptability is equally important. If one strategy fails, communication allows tactical adjustments mid-match
Communication Mistakes to Avoid
Staying silent during confusion
Overlapping coverage repeatedly
Blaming instead of adjusting
Constructive communication strengthens partnership performance.
Drills to Improve Positioning & Rotation
Consistent practice is the only way to make doubles positioning and rotation automatic. The following drills are designed to improve movement patterns, communication, and tactical awareness.
1. Shadow Rotation Drill (No Shuttle)
Purpose: Build automatic movement patterns between formations.
How to Perform:
Start in side-by-side defensive formation.
Simulate lifting the shuttle.
Move into front-and-back attacking formation.
Simulate a defensive block and rotate back to side-by-side.
Repeat for 60 seconds continuously. Perform 3–4 sets.
Coaching Focus:
Smooth footwork
Clear communication (“switch,” “up,” “back”)
Proper spacing during transitions
This drill builds muscle memory without pressure from live rallies.
2. Smash and Intercept Drill
Purpose: Improve attacking coordination.
Setup:
One pair attacks.
A feeder lifts shuttles to the rear player.
Execution:
Rear player smashes.
Front player attempts interception or net kill.
Rotate positions every 10 shuttles.
Coaching Focus:
Front player stays low and alert.
Rear player recovers quickly after smashing.
Maintain correct front-and-back spacing.
This drill strengthens offensive pressure and finishing ability.
3. Defensive Block and Counter Drill
Purpose: Practice transition from defense to attack.
Setup:
Feeder smashes alternately to each defender.
Execution:
Defenders stay side-by-side.
One player blocks softly to the net.
That player moves forward while partner shifts to rear court.
Coaching Focus:
Quick recognition of attacking opportunity.
Smooth rotation timing.
Controlled defensive blocks rather than random lifts.
This drill trains real match transition scenarios
4. Flat Drive Exchange Drill
Purpose: Improve reflexes and stability in fast rallies.
Execution:
Both pairs remain side-by-side.
Exchange flat drives continuously.
After a downward shot opportunity, rotate into attack.
Coaching Focus:
Racket in front at all times.
Avoid lifting under pressure.
Maintain balance and spacing.
Flat drive control is crucial at intermediate and advanced levels.
5. Game Simulation Drill
Purpose: Combine all skills under match conditions.
Play half-court doubles with restrictions:
Attack must be initiated within 3 shots.
Rotate correctly before attempting a smash.
This encourages structured play rather than random hitting.
Match Tactics & Real Rally Examples
Understanding positioning in theory is important, but applying it in match situations wins points. Below are practical rally examples.
Example 1: Winning from Serve
Server plays tight low serve.
Receiver pushes flat.
Server’s partner intercepts downward.
Team rotates into front-and-back.
Rear player smashes.
Front player finishes at net.
Lesson: Strong serve + aggressive third shot creates immediate attacking advantage.
Example 2: Turning Defense into Attack
Opponent smashes.
Defender blocks softly to net.
Blocking player moves forward.
Partner shifts to rear court.
Opponent lifts under pressure.
Team now attacks in front-and-back formation.
Lesson: Controlled defense creates attacking opportunity.
Example 3: Managing Flat Exchanges
Both teams exchange drives.
One player spots weak mid-court shot.
Downward drive played.
Immediate rotation into attack.
Lesson: Recognize momentum shift and act instantly.
Tactical Match Principles
Attack the middle to create confusion.
Maintain patience during defense.
Avoid overcommitting forward without clear advantage.
Communicate before every serve and during key transitions.
Strategic awareness often outweighs physical strength.
Common Positioning Mistakes & How to Fix Them
Even experienced players struggle with positioning errors. Recognizing and correcting these mistakes is essential.
1. Standing Too Close Together
Problem: Leaves wide angles open.
Fix: Maintain clear left-right court division in defense.
2. Rotating Too Early
Problem: Exposes rear court gaps.
Fix: Rotate only after confirming attacking advantage.
3. Both Players Moving Forward
Problem: Vulnerable to lifts and clears.
Fix: Always ensure one player protects the rear court.
4. Poor Smash Recovery
Problem: Slow transition to next shot.
Fix: Focus on balanced landing and quick split step.
5. Lack of Communication
Problem: Confusion in mid-court.
Fix: Use early and decisive calls.
Correcting these errors significantly improves rally consistency.
Advanced Performance Analysis for Doubles Teams
At higher competitive levels, teams analyze positioning patterns to improve performance.
1. Video Review
Record matches and observe:
Spacing during defense
Timing of rotationReaction after smashes
Video highlights positioning flaws that players may not notice in real time.
2. Control Area Awareness
Elite coaching systems emphasize controlling more playable court space than opponents. When positioning is synchronized, teams reduce open angles and force weaker returns.
3. Data-Driven Improvement
Advanced teams track:
Smash success rate
Defensive block quality
Rotation efficiency
Monitoring these metrics helps refine tactical execution.
Final Summary & 4-Week Action Plan
Mastering badminton doubles strategy and positioning requires structured development.
Positioning provides structure.
Formations create tactical clarity.
Rotation connects both into a fluid system.
Serving and shot selection maintain pressure.
Communication ensures stability.
Together, these elements create a complete doubles framework.
4-Week Improvement Plan
Week 1: Focus on side-by-side defensive stability.
Week 2: Train front-and-back attacking coordination.
Week 3: Practice rotation drills and transition play.
Week 4: Combine everything in match simulations and video review.
Consistent, focused practice transforms understanding into performance.